![]()
![]()
When you open the Page Editor, a number of sections and tabs are displayed, depending on the type of page you are editing, and the configuration of the site you are working on.
Page Summary sectionPage Summary section
The top portion of the page editor contains the Page Summary information which includes the name of the page (what the link will look like), the page's location within the site, the page type and id numbers, and the Show History and Move Page features.
Content TabContent Tab (where general text/images and other content are entered)
This tab is displayed for all page types with the exception of the Category page type. This is where all of the page content is entered. It contains the General Properties section for recording teaser information, and displays the content editor windows for adding content.
Child Pages tabChild Pages tab (for adding additional pages)
The Child Pages is where you add new pages to your website. When you edit a page, you can add children to its Child Pages tab, thus building your site hierarchy. Below is a description of what each column does on this tab:
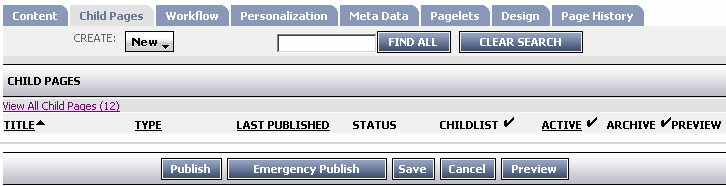
New button: Hold the mouse over the New button to see a list of page types you can select from when creating content.
Find All/Clear Search: Type a portion of the child page name in the text box and click Find All to locate pages matching your search text. Use the Clear Search button to clear the text from the box.
View All Child Pages (XX): When you first edit a page the child page list is not loaded. This saves time when editing pages. Click the View All Child Pages (XX) link to display a list of the child pages associated with this parent.
Sort Order: Numeric sorts the pages in the order in which they were created. Alphabetic resorts the pages by the first letter of the page Title. This field is only displayed when you click on the View All Child Pages link.
Order: Click on the Up and Down arrows to reorder child pages. This field is only displayed when you click on the View All Child Pages link.
Title: Title of the page as assigned by the person who created the page.
Type: Type such as Home, General Content, Blog, Calendar, etc.
Last Published: The last date on which the page was published.
Status: Indicates if the page is currently pending, published, a draft, requiring review, etc.
Childlist: When this column is checked a link to the child page is displayed on the published parent page. When the column is unchecked, the child page link is not displayed on the published parent page. Clicking the ![]() selects/deselects all child pages.
selects/deselects all child pages.
Active: Use these checkboxes to control the usage of a page. When unchecked, the page is retained in the Child Page list but is not displayed on the site. When checked, you can publish the page and it will be displayed on the site. Clicking the ![]() selects/deselects all child pages.
selects/deselects all child pages.
Archive: To archive a page, check the checkbox and click Save. This will move the archived page to the ACM's Archive Manager. Click the ![]() to select/deselect all child pages for archiving. Once archived, pages can be restored or permanently deleted using the Archive Manager.
to select/deselect all child pages for archiving. Once archived, pages can be restored or permanently deleted using the Archive Manager.
Preview: Click the preview link to see what a page will look like when published.
Workflow tabWorkflow tab (follow-up tasks)
The Workflow tab displays the name of the workflow that the page is assigned to. Workflows control which steps the page must go through in order to be published. The Workflow tab also contains information pertaining to the page's current status, its modification and publication dates as well as the next scheduled content review dates.
Notes for each step in the workflow are also available until the page gets published at which point the notes are cleared.
Follow-up tasks
The follow-up dates and tasks settings are configured in the Global System Variables, the Site Variables and the Page Types manager.
The Global and Site Variables managers allow you to set a default follow-up timeframe (e.g. 90 days, 180 days, etc.). When a page is created, the follow-up date becomes the creation date plus the 90 or 180 days.
If you set a page to Review, the system will expect you to review the page according to the follow-up days you set. If you are late reviewing it, the system will still require that the next review take place at its originally-scheduled time.
This is also true if you change the review period setting. If you change the period from 90 to 180 days, any pages set to be reviewed will retain the original 90 day setting. They will only change to the 180 day period after being reviewed (or manually changed).
Translation tabTranslation tab (used for multi-lingual sites)
If the site you are working on is part of a set of sites that get translated, the Translation tab will be displayed, otherwise you will not see it.
Use settings on the Translation tab to control the translation of the page content.
Personalization tabPersonalization tab (for controlling access to page)
The Personalization tab is used to restrict access to a page or section, to certain individuals or user groups. This is useful for sensitive content such as financial information. Once personalization is implemented, users require a user id and password to access those pages on your live site.
See Creating restricted access sections on your site.
Metadata tabMetadata tab (so web searches find your pages)
Your site administrator can configure a series of questions for you to answer on the Metadata tab. The process of answering the questions applies metadata tags to your page. These tags help your site search engines identify the subject matter of your page content.
Pagelets tabPagelets tab (for adding reusable content)
If you have content that is used repeatedly throughout your sites, authorized users can create a single instance of that content to be used over and over in different site locations. These single instances are referred to as Pagelets.
Pagelets are like mini-pages, hence the name "pagelets". If a change is required to the information contained in the pagelet, it can be changed once, in the Syndication Manager, and then all instances of that content are automatically updated so that all pages and sites where the pagelet is used reflect the change.
Pagelets are added to pages on the Pagelets tab. However, the tab is only displayed if the page's template includes special pagelet tags which are added by the site administrator during the site design phase.
Design tabDesign tab (for adding scripts to pages)
The Design tab of page edit mode allows you to quickly add scripts that are inserted within the <head> tags of the published page. Using this feature you can control many of the settings that are normally only available via the Site Design Manager.
The Design tab allows you to edit the following design settings:
Template Settings for the current page
Template Settings for the page’s child pages
Variable Token settings
Section Menu settings
Site Map settings
Search settings
Page ID
You can also use the plain text area to insert html, scripts and style information. When the page is published, the code entered in the text area field is placed inside the page's <head> tags.
NOTE: These features are not available on the Design tab until the page has been published for the first time. Once published, the configuration and design options are displayed.
Once you have created and published a page, edit the page and go to the Design tab.
The Template section allows you to adjust a number of the Design elements that are controlled in the Site Design Manager.
The Page Header Content section is where you can enter scripts and other information to be added to the <head> section of the page when published.
For more information on using these features, see:
Applying design templates to pages
The Email tab is only used by pages that include email functionality. Examples include the Listing Service, Blog, Syndicated KBArticle Search and Calendar page types. The Email tab provides a means for you to customize emails for these pages. Note that these emails are completely separate from the System Emails found in the Global System Variables on the Email tab.
System administrators can control whether or not the Email tab is displayed on these pages by checking/unchecking the Email tab checkbox in the Group Manager - Edit Groups - Allow Tabs settings.
To view and edit emails on the Email tab:
While editing the page, click on the Email tab. A list of email templates associated with the page is displayed.
Click on the Email name link to edit the email. A window is displayed with the subject and body content of the email.
Make edits to the email and click OK to save the changes.
Click Save and publish the page.
Page History tabPage History tab
The Page History tab only appears if you check the Show History checkbox, located in the Page Summary section. This tab displays the edit dates and times as well as the name of the user who made the changes.