![]()
![]()
This step is done after you have created your workflow and configured all of the workflow users. See Creating Workflows. For each content area of your site that will have the same content providers, approvers and monitors, you can assign the same workflow. When you apply workflows, you apply them to sections and pages of your site. You can apply different workflows or force the child pages to user the same workflow that the parent page uses.
Be sure you are logged into the ACTIVE CM.
From the Admin Center, open the Workflow Manager.
From the Site drop-down, select the site to assign workflows on.
From the Page List, locate the page to assign a workflow to and click the (Edit) link at the end of the title.
On the Select Workflow dialog, click the Use Parent Page's Workflow if you want this page to use the same workflow that its parent page uses. If you want this page to have a workflow that is different than that of the parent page, select the workflow from the list.
If you want to force all child pages of the current page to use the same workflow, click Set Child Workflows.
Note: Once you have done this, all new child pages will automatically be assigned the same workflow as the parent page. However, when you view them in the Page List, they will not automatically display the assigned workflow at the end of the page name, even though they have been assigned the same workflow as the parent.
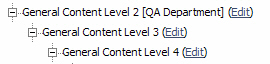
In the above illustration, General Content Level 3 and 4 have been assigned the same workflow as the parent General Content Level 2. However, the system does not display the [QA Department] workflow name in brackets beside the names of the child pages. But if you edit them, you will see that they do indeed have the parent's workflow assigned to them.
Click Save on the Select Workflow dialog. The name of the workflow you just assigned appears in brackets now at the end of the page name.